Sunday 25 March 2018

Productive weekend: 3 pairs of leggings and a Burda Style shirt

After my disasterous jacket last week, I decided I must just keep sewing despite some terrible makes. It was a real shame it did not work and to be honest I am at this place now where I do not dare to cut anything else until I sort out the fitting problems with that jacket because until I do I could end up with fitting problems on everything else that is similar. In other words fitted clothing - so shirts, jackets etc.
In fact I am going to have a go at making jeans soon because that is something I managed to make as a twenty something and without a pattern. I used proper jeans buttons and rivets etc then too. So assuming I have not completely lost all my skills down to aging then I should still be able to make jeans. I think its time to do what I used to be good at, and stop copping out.

So I need cheering up. I have already chosen my fabric to remake the disaster jacket ( perhaps I should rename my blog post about it that!). Trouble is to do the FBA I need to trace the pattern and have no paper and Karey said to do the adjustment on non-woven interfacing and I have none of that either so the FBA is going to have to wait till next week. I already have my fabric for it washed and dried though so once its done here comes version 2. Anyway because of this possible FBA / fitting problem I feel reluctant to cut anything out, other than things that are "likely" to work.

I aleady have this top cut out back in January when I was all enthusiastic and raring to sew. The pattern is Burda Style 116, 10/2017. Nice top. Zip front and a few ruffles. I never fancied the front ruffles but did cut out the sleeves ruffles x2. It does fit despite the jacket not fitting so that is going to make everything far more difficult. As in will a future pattern need a FBA or will it not need it? Oh dear. I see endless muslins in my sewing future..............................................

Back to the new shirt: I sewed the first ruffle on one sleeve and was very unsure about it so decided to cop-out and not add the second ruffle and just have one sleeve frilly.

I have tons of zips but none with a closed end it seems. I bought loads from a company that was closing a while ago so have oodles of open ended zips but no normal zips. So I decide ( stupid me!) to use an open ended zip which went in fine. But it was full length so I went with that. End results is sort of jacket - wise despite being a shirt.

Still not sure about this at all!


 Then I attached the facings and was nearly finished making this top when the overlocker cuts off the end of the zip, ( yes being lazy and overlocking as much as possible despite it being a  woven fabric).  And the zip is a trifle long - I was intending to pop it into the neck edge and there it goes chopped off by the overlocker, o not the best way to sew it up. So then I have a problem cos the facing is slightly short so does not cover the zip. So ruffle number two becomes collar and cuffs. But unlike the disaster jacket at least my collar matches up on both sides so thats something to be happy about! I had just the right amount of scraps of interfacing to do these. I wish I had done the back yoke too with interfacing although the pattern did not tell me to because you can see the spiders from the lining showing through to the top fabric. Its a cheap poly cotton off Ebay. £1.99 a meter. I bought 2 meters a while ago on impulse. Though to be fair its a great cheap fabric to use as your muslin and still wearable so not such a bad buy after all. Yes folks,  I am now convinced after the disaster jacket that I really do need to make a muslin.


Then I added my button holes. Tested on a scrap first and went fine and just like the last time I made a button hole on my skirt it went wrong. But this time I am ready. I bought a tiny stitch ripper, I knew it would come in handy when I saw it on offer. Just 99p. Bargain, so I actually unpicked my dodgy button hole, managed not to damage the fabric and then redid it and this one worked and so did buttonhole number two. My machine can sew on buttons. I have yet to learn how, but its something I need to do because I hate sewing on buttons and now I am finally venturing into the world of serious sewing I think I need to learn to do this. It will allow me to make more and finish rather than cop-out with fastenings all the time and have a growing pile of UFOs. Joining cuff to shirt sleeve was a bit odd on the sleeve with a frill cos you need to pleat the sleev into the cuff without pleating the frill. It works though I am not so sure I did it according to Burda instructions because I did not understand them. I realised later that the frill I had done, I added wrong. It was meant to be sewn into a tube before attaching. Ah well minor error that. I did a nice rolled edge on it which I am pleased with so I can live with that oversized frill. I do wish I had added the second frill because I actualy like this sleeve with a frill a lot.

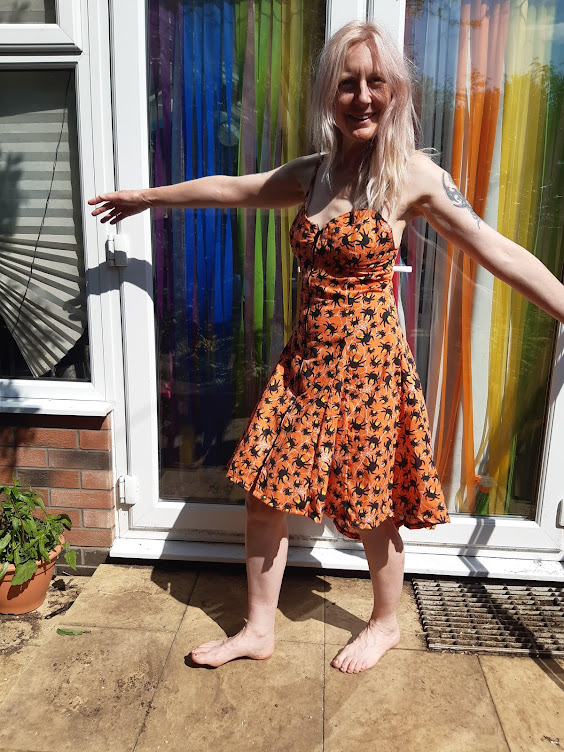
So This is my shirt.

I do not partcularly like my long front zip cos it just feels a bit weird on a  shirt.
As you can see if you were to do this to this pattern you need to change the facings which stop where the original opening does. I probably will not wear this as far open anyway so no worries about it right now.

At least its fitting OK.


I had already cut this out before I knew I might need a FBA. To be honest I have not got big boobs so it never occurred to me.

Still from what I have read it is probably true because in RTW I always but the trousers 2 sizes smaller than jackets when I buy a suit ( as in interview type clothing).Will know about this next week hopefully when I have the materials for the FBA experiment.

So this shirt is finished despite being another suspect in my long line of slightly not perfect makes.


So yesterday afternoon I decided to cheer myself up and make something that in all likelihood will work out. So I cut out some easy to sew stuff - just to give myself some encouragement. So I cut 3 pairs of leggings out and some T shirts. These are the leggings:


The red tartan are virtually identical to these: http://brackencrafts.blogspot.co.uk/2016/01/10-tartan-leggings.html   which I have worn until they look old. They are cut to the normal lenMcCall's M6173. The original pair were the longer ruched length. gth on The fabric is not particularly good quality two way stretch but does seem to keep shape and in I have not gained saggy knees in my old pair despite it appearing to be a polyester fabric without lycra. Still I am guessing. I do not know what the fibre content of any of these fabrics are.

I am quite pleased with these Tartan leggings cos the pattern almost matches accross the front. Sadly not at the back but half way there!


The black and white stripe I cut to the longer length which is probably a mistake. May shorten later. The print is a graduating pattern from black to white stripes so the front ends up lighter than the back. 4-way stretch though and lots oflycra by the looks of it. Other than the length I like these though am thinking maybe should make a size smaller more like proper exercise wear.


Third pair - blue animal print are not quite right. I love them but the ankles are too wide. This is a very soft 4-way stretch which is lovely and soft. No idea what this fibre is but would like more of this though it is quite difficult to sew.


All 3 pairs are overlocked and then the elastic is sewn in a loop and then attached to the right side to the waistband by twin needle stitching to give it stretch then it is flipped over and sewn down again with twin needle stitching. I found this method a while back and it beats having a waistband where the elastic gets twisted inside.

Ah so not a complete waste of time this weekend after all. I am still unhappy about the disaster jacket but maybe next week I can get that sorted - or at least the pattern adjusted and version 2 cut out and then see if it will fit me.I suppose in the end if I keep making it it has to work out.
Thanks for visiting
Bracken

Friday 23 March 2018

Easy to make DIY needle case. A rant and I am not buying or collecting any more patterns!

Before I even started to consider sewing and blogging or even just sewing at all I made this needle case. It no longer look perfect and new because it is used and in use in my photos. I have not set this up just taken photos as it really is. It is used all of the time so I thought I would tell you about this and how this tiny case got me back into sewing.


This is a very easy, but very practical sewing project. It is also particularly good if you want to make something and have very little fabric and have not sewn ever before or not for ages as was the position I was in when I made this. I had lost my confidence completely but actually needed this to sort out my needles.

It is a great beginners sewing project in fact and if you need somewhere to begin and want to go on to sewing your own clothing this little case will be very useful to you in the future as well as giving you something to sew now. Achieving a small item like this was very encouraging for me. I needed it to be sure, but I really also needed the confidence to get sewing.

It all began in January 2009 when I was out of work, had through necessity decided to make my soap making into a business ( it never made money really and still exists as a hobby business now). I spent seral days hacking appart and upcycling my existing clothing nd a friend was so impressed she gave me some of her unworn old clothes as well. Then I started to browse free patterns on the internet.  It was then back in 2009 I first found Burda. I had not sewn anything for about 20 years. It was then that I began to collect patterns. What I should have done right then was download all the then free patterns on burdastyle.com because nowadays you have to pay for them. My pattern collection has now grown to ridiculous proportions so that it is difficult to house it. I have September onwards from 2013, all the 2014,  all the 2015 Burda Magazines, all but one of the 2016  when I had a subscription. I also have several from 2009, 2010 and 2011 mostly bought from Ebay as second hand and a small number of odd issues from the 1980s and 1990s as well as 3 Patrones, a Neu Mode and a couple of other unusual titles all in other languages than english. Then there are my paper pattern collection. I have no idea how many patterns I have and to be honest I am scared to count and admit how much money I have "wasted" on them. Many are so similar I cannot justfy what I have spent. I have tried to be more discerning in the last couple of years but when you need to buy a large ( as in large!) plastic storage box and you still cannot solve the problem of storage then it has to be time to stop. And this is not counting any of my free and paid for downloads. Mostly free but lots of data storage taken up here. A friend told me recently I am addicted to data. But its all patterns. Not all sewing but knitting and crochet too and I cannot crochet! So I have enough patterns that if I never made anything twice and made something every week I could never make them all in the rest of my life. And I am not someone who goes into collecting stuff. Or not till now. I always have clear out and get rid of things. It seems I have found my area of "collecting". It has to stop. Where I am not yet going to stop stashing fabric like many other sewists - you can read the current conversation on this here:


I am going to stop stashing patterns.

Well there is definitely something there to think about from the planet point of view as well as space and money etc when it comes to stashing fabric. For me though I think it is patterns are my real problem. Yes I have a decent sized fabric stash by any standards but if I did not do this I could rarely afford to sew when I want to, so I am not currently making any decisions to lose my fabric stash or even to reduce what I buy, which really is not that much yearly.  I do not waste resources anywhere near as much with fabric stashing as I am with my pattern obsession - and stashing!

So I am really going to say enough is enough.

I AM NOT BUYING ANY MORE PATTERNS!

That's my pledge to planet earth

Fabric: well I need that at the moment else my patterns really will be a waste of money and paper, and data. It is now time to just MAKE! For me anyway.

I used to sew a lot in my youth when I was poor and in and out of work in the 1980s recession. As times got better I gave up sewing. Boy! do I wish I had had these patterns then! But then, in my 20s and early 30s,  I was thinking life was better if I could have RTW fashion clothes.

In the 1980s I just did not have enough cash to actually buy clothing so I began making things from fabric such as curtains bought from charity shops into jeans. Without patterns too. But then when you have a real need you become very inventive. I got so good at it I actually sold some jackets and jeans to friends. They were all made to fit specific people ( and with no pattern other than their existing clothing) so not really in any particular size. I started a mini local fashion in Coventry, UK for jackets made from old velvet and brocade curtains and even to this day I love those fabrics especially when made into "denim jackets". I also made baseball caps from these fabrics - well it was the 1990s by then! This is where I now need to get back to.

I have had an obsession with buying patterns for several years but I do not need half of them because if I can get to be good at this I should be able to copy just about any high street clothing which is exactly where I began to sew from. I never used to use bought patterns because if I wasted money on a  pattern then I could not also afford the fabric to make whatever it was I wanted. I am talking about a time here when it was difficult to eat every day. I really was that poor and so were many of my friends.  So to make clothing, I used whatever was free or cheap. We all lived in rented landlord houses and often we found old curtains hidden in the under the stairs cupboard where the electric meter was kept. They were usually 1960s and 1970s horrendous designs but washed and made into jeans and combats could be very stylish in a world where everyone was unemployed. Of course there was another very useful side effect from this way of sewing - I usually had loads of spare fabric and if I cocked it up and trashed it, it cost nothing other than the thread to sew with and if I made it work it was considered a huge success.

I started to sew again around 2010. I had been downloading free patterns for a year by then and just thinking about sewing.  Then I made this dress. It was not very wearable other than for a festival. I like this rather nice dress which was made from what was stashed in my wardrobe - a small piece of yellow velvet bought from a second hand shop, scarves and some second hand sari fabric for a lining. But I could not wear this dress for every day life. It simply would not be acceptable for example at work in an office. This is why I am not getting rid of my fabric stash. I need it else all my makes will end up unwearable although quite beautiful in their own way. I want to make real everyday clothing as well as a few quirky bits and pieces.

This time around sewing was more of a challenge. It took probably 2 years before I seriously started to sew despite suddenly being out of work and living in relative poverty. Having said that I never went without food, electric or anything really but relative to when I was working I felt poor. I also had a garden and grew veg so really I was relatively well off. I just had no cash to spend at all. As in really nothing spare after bills.  You can get by quite well in this kind of world. Its a different kind of poverty to what I suffered in the 1980s though and is very difficult to describe to people who never lived through that period.  

Interestingly the first thing I made in 2009/2010 was the needle case, shown at the top of this post and below there are more photos, from some old clothes I no longer wore. Good move that. It came about due to my having collected loads of separate sets of hand sewing needles. It seemed that for the last 20 years or so I have been buying them every time I lost a button or needed to repair my RTW clothing and I suddenly realised they seemed to be stashed all over the house in odd corners and drawers. I needed to collect them all together to rationalise them and to make them easy to locate when I actually need to sew something. So I made this needle case which still serves me well.

Its a very good needle case, I use it at least once a fortnight, maybe most weeks, and is really just 4 rectangles.

One for the outside, one for the lining and two rectangles of felt all sewn into a "book".


The finished article measures 22cm x 14 cm but really can be made in absolutely any size depending on whatever fabric scraps you have. The outside is made from a  second hand tiger stripe skirt. The outer fabric is a cross between fur fabric/velvet. Originally cos me about £3 from a charity shop and then sat in my wardrobe for about 10 years. I always wanted one like that when I was a teen but unfortunately by the time I owned it it really did not fit who I had grown up into. So there it sat. For years! Loved, wanted but never worn.

The inside fabric is  small piece a friend salvaged from a skip. A curtain shop had thrown out hundreds of samples. I had previously made it into a small tablecloth for a table we had made from a reel of wire which was left for collection outside my block of flats by the city council electrical technicians.

I wish I had a picture of my tables. I had 4 of them in different sizes. All were made from dumped electric wiring reels and all were sanded, dyed black ash ( it was the 1990s!) and then either beeswaxed (which was very hard work but well worth it for the shine) or varnished. They were something else and ranged in size from side tables to one large one we used as a dining table for Christmas Dinner with our friends. I have since seen similar ideas on the internet but there was no internet then. This was simply necessity since we had no money and no furniture and they were there asking for me to grab them. Anyway I have no photos of them. I made a table cloth for each one and this inner fabric is what is left of one of the smaller table cloths for these tables. 

To make this: first I cut the rectangles one for the outside, one for the inside. If you want it the same size as mine you will need to cut 22cm  + seam allowance x 14 cm + seam allowance so add about 1.5cm on because you can always trim off any excess before you turn it the right side out. Place right sides together and sew all the way around but leaving a  small gap to turn right side out. Cut a diagonal off each corner close tot he stitching but not cutting he stitches to make it easier to get a decent corner after it has been turned. Turn right side out being sure to pull the corners out as must as you can and pin all the way round then top stitch. This closes the small gap you left as well. 

Cut your rectangles of felt - just a little smaller than your case. Mine are not square but still work fine. Then sew two rectangles of felt ( warning if you are vegan - I do not think the felt is. I am pretty sure it is wool. Normally I do try to be a good vegan but in the end this bit of felt has been around for probably 25 years and I inherited it then so I think its fair dos to use this rather than throw it away. The planet matters too. Felt works well for holding the needles. 
Then all you need to do once the cover is made and the felt pieces are cut is to fold both the outer case and the inner felt pages in half, position so the folds on both line up and sew right up the centre line. This will give you a "book" with a cover of your outer fabric and inside there will be 4 ( or twice as many as your rectangles of felt) pages.


You can use both sides of each page buy I try to just use the one side then the needles - with the cottons I tend t leave attached as you can see above, do not tend to tangle and stab you as much when you are locating the needle you want. I originally had a page for crewel ( big eye needles) including the bodkins - wool needles, a page for small eye sewing needles and then used the inside cover for safety pins and elastic threaders.


You can see where the felt is used left where I have started to tidy up my needles. But then decided what the heck show you how it really looks not a nice set up picture. This the real deal.

That is really what prompted me to blog about this needle case. Its kind of insignificant but for  me it was THE step that caused me to begin sewing my own clothing - at least this time round. So not really a small item at all but a major game changer!

The blogging idea came later when I felt alone and without friends who can understand. It connects me to the rest of the sewing community. Don't get me wrong I have my friends but none of them sew. Lots of them craft  in paper or paint but despite  the fact they appreciate my makes I need to talk to other sewers. It makes life 
better and more fun. I love to take part in collective sewing such as The Monthly Stitch challenges. Its about communicating with others like me. 

As you can see from these pictures my needle case can get very messy but I really do use this most weeks and it does work wonderfully to keep everything together and safe and stops me losing needles onto the floor. I decided not to set up the needle case to look perfect to show how much I actually really need this and use it.

Thanks for reading and just for the record: I really am going to stop buying patterns because in reality I am at the point where I like to see what is new but really I probably already own a similar pattern so why would I need to buy aother virtually identical one. _ its going to be hard to stop myself but I am going to try.
Bracken

Sunday 18 March 2018

Completed at last - Peplum Jacket in Green Faux leather.

This jacket is yet another item that was far harder to actually make than to dream about making. I had the idea back at the wonderful New Year when I made my plans like many of us do to sew certain things that I actually need.

I made the very successful and easy to make faux leather skirt and wanted a jacket.


I have never made a peplum jacket so went with Burds Easy. Its the second item I have made from a Burda Easy and to be honest they are NOT EASY.

I think ts called Burda Easy because you do not need to trace and the styles are very teen inspired. Don't let that put you off though because they are also very wearable. Possibly the problem is all things I have made are the difficult patterns and I am taken in by the magazine title. The shirt I made worked and this has also worked.

They just take longer than I expected. But then most things do.


I suppose I really like to churn out fast easy projects which helps with blogging because I have something to write about every week, but really it is time I started to spend longer, and make better more involved clothing so apologies if the blog posts get further appart.

When you read all this stuff about being a successful blogger, a post a week seems to be a must, but really my blogging is a way to connect with people like me who sew, because its a lonely world otherwise. Its not really about being a blogger. Thats just the means to an end. And its a very successful way to feel connected. I a not really into Facebook, Linkedin, Twitter etc but I do enjoy blogging.

Though blogging does also mean you see your makes differently because you see photos when perhaps you would not normally take any and then you see things as others do and you see how something does not hang quite right - see my peplum!

Or is that just a crease?

I think blogging does help with perfecting your sewing. Also when people tell you where you went wrong that is so helpful. It really is a good thing to get criticism and advice from other sewists. Or sewers.

I will still aim to do a post a week or more but when all you have achieved is unpicking something ten times it gets a bit difficult.

Well this faux leather is ok for unpicking as well which surprised me especially after the antics with my T shirt.

On this occassion, I immediately unpicked when I went wrong  rather than go away and leave it.

It went wrong when I put in the zip, and later when I tried to finish off the neck.

Loads of problems in fact possibly down to my inaccurate cutting out with blunt scissors. Yes, I have to get round to buying some new ones asap because sharpening has not really helped much. I think there must be a burr stopping them working properly. They no longer cut along the entire blade.


Well the actual attaching of the zip, whilst giving me some thought to get it right, went OK. As explained in my previous post about constructing this jacket

This Burda Easy is in German so I need to be a bit creative. But then, I have yet to follow a Burda pattern that does things in what I think of as the right order anyway. I usually have to wing it.

I tried to sew the topstitching down the side of the zip, where you get the zip overlap - not sure what this is meant to be called. I carefully pinned onto the stitchline and I sewed from the right side. It went OK at the start then just all puckered up.

Disaster thinks me and ruined jacket from my lovely fabric. And this fabric was very cheap. this bit was just 99p for about 3m, but I still love it, it was such a  bargain. I cannot replace for that price since the Ebay seller has since realised what it is she is selling. It now goes for £7 for 2m. Still Ok but this was much cheaper. I was very lucky to get it in the frst place. Green is not my first choice for leather but not a bad choice when this cheap and I do wear dark and bright greens a lot.

I also thought it will look great made into this jacket. But I am tired at the end of a busy weekend and get on with sewing to try and get this finished and I HAVE to immediately un-pick when it all went wrong. If it was any other fabric I would have done this later to avoid slipping with the stitch ripper when tired. I needed to stop but I persevered. I very slowly unpicked and forced myself to take a break half way through to ensure I did not destroy this.


Had a cup of tea and then when I had already decided to stop I just went ahead and sewed it with the right side down over the same stitch marks. I never pinned this time and its not quite perfect but does actually look passable. I do not think I would have done a better job later taking more time so thats the best I am going to manage I think. It will have to do. Its a bit narrower at one side at the top of the zip than the other but does not look too bad on.

So then I hand sewed the peplum lining up. I needed to add tucks on the reverse to make the peplum work. Again probably imperfect cutting. I think its is still not quite rigt in the way it hangs but only realised that after seeing the pictures. Definitely seems to be pulling a bit to one side (see the picture above)  so I may get round to undoing and resewing this at some point.

Not now though because I have really had quite enough of this jacket and I am prepared to wear it as it is for a few wearings at least. I will see if it hangs out first because I did leave this in a pile of UFOs for over a month so have not kept it well and it did get creased. Being coated cotton I feel worried to iron it so will leave it for now and wait.


Then I couldn't get the collar to work either. I unpicked that 3 times before waking up in the middle of the night with a realisation that bias binding - I already have some in dark green which sort of tones - in a  band attached to both the facing and the collar would sort the problem out. I think the facing was a touch too short but it works in the end. It was a bit fiddly to sew to each side but I got it done very quickly one morning. I hand sewed the inside collar next to the zip ending and the neck facings. The collar as you can see is higher one side or at least the facing shows more one side than the other!
It is a bit too tight possibly too or maybe my shoulders are too wide (they are wide!) so next time I think I may need to do some pattern adjusting here - wow I am getting so knowledgable now.

Wouldn't have even considered adjusting a pattern a year ago!

I have currently no idea what I need to do to correct this so will need to read up on the best way to adjust this - any help or advice on pattern adjusting for wide shoulders appreciated.

It has taken me months to make it, but mainly it has been the fact I needed to sew the cuffs by hand since I had such problems with the rest of the top stitching I decided not to bother to sew topstiching to attach these - at least I think that is what Burda is telling me to do, but as explained its in German and my german language skills are limited so I am going by pictures here. Since I couldn't handle the hand sewing  and that meant I could not attach them any other way, this has had to wait till I got round to it which as it turned out was several weeks.


I am now in exactly the same boat with a coat I am making,  and I have to hem the coat by hand and attach the lining which is a BIG project but more later on that, hence this was the smaller project so I finally got it finished. 


Since its taken me so very long to sort out the problems with this jacket I really have had enough.  I need this project to end!

I do not want to scrap it but its not very good really. But it does work despite all the mistakes and my next one should in theory work better. I am reasonably happy despite my collar which is definitely not right. It looks OK according to my other half who can be very critical. I can wear this despite the neck, because unless I do the zip right up, which is something I am very unlikely to do anyway, you actually cannot really tell its wonky. Having long hair probably hides things too so I will try not to tie it back when wearing this!
And really I should now move on I think and maybe make another more perfect version of this and use this as my muslin. Maybe a size larger too! And with adjustments............


Sad I had to go and make my first attempt from my faux leather but then they do say make a muslin first don't they. Wise words in this case but a bit late for me to realise that!

So here is is with my green skirt:


And here I feel cosplay-ish with my green faux leather leggings:

 
Could do with a sword or something here!
Yes. its OK despite its faults and again it was a real learning curve and after all thats the whole point of this blog.

Thanks for reading and please feel free to leave any comments - especially if you have advice on how to do this better or make adjustments for wide shoulders because everywhere else it fits, because thats what I need for my next version of this pattern - and I haven't a clue where to start. Maybe I should cut a larger size and try to grade in to the waist?
Thanks for reading,
Bracken